Triggers
Trigger types
There are two types of triggers supported by API:
1. Camera trigger
This will trigger the camera. On each trigger, the camera will send a single frame.
2. Frame Grabber trigger
In this mode, the camera should run in continuous mode. When the Frame Grabber is triggered, it will allow for a single frame to be acquired in the allocated buffer.
Triggers examples
Software trigger
Basic example to configure single frame acquisition with a software trigger.
- Open Vision Point, select the frame grabber, and scan for cameras
- Open the camera parameters browser and navigate to Acquisition Control -> Trigger Selector
- Set "TriggerMode" = "On"
- Set "TriggerSource" = "Software"
- Start the transmission on the camera
- Every time you click "Execute" at the "Trigger Software" will trigger the camera to image acquisition
Timer trigger
This example describes how to set up a timer as a trigger. Before configuring, open Vision Point, select the frame grabber, and scan for cameras.
Step 1: Configure the timer to create a square wave:
- In the frame grabber parameters browser navigate to "Frame Grabber I/O Control" -> "Timer Control"
- Set "TimerTriggerSource" = "Continuous"
- Set "TimerSelector" = "Timer0"
- Set "TimerDelay" and "TimerDuration" to get the desired frequency. See examples below:
| Parameter | 10KHz | 10Hz | Description |
|---|---|---|---|
| TimerDelay | 50.0 (50us) | 50000.0 (50ms) | 100ms total clock pulse which gives 10 FPS |
| TimerDuration | 50.0 (50us) | 50000.0 (50ms) | 100us total clock pulse which gives 10,000 FPS |
Step 2: Configure the frame grabber to send triggers to the camera
- In the frame grabber parameters browser navigate to "Extended Stream Features" -> Choose "Camera Selector id" -> "Camera Trigger Control"
- Set "CameraTriggerMode" = "On"
- Set "CameraTriggerActivation" = "AnyEdge"
- Set "CameraTriggerSource" = "Timer0Active"
Step 3: Configure the camera to receive the triggers from the frame grabber
- In the camera parameters browser navigate to "Acquisition Control" -> "Trigger Selector"
- Set "TriggerMode" = "On"
- Set "TriggerSource" = "LinkTrigger0"
Step 4: Configuration is complete, start the acquisition to view the results.
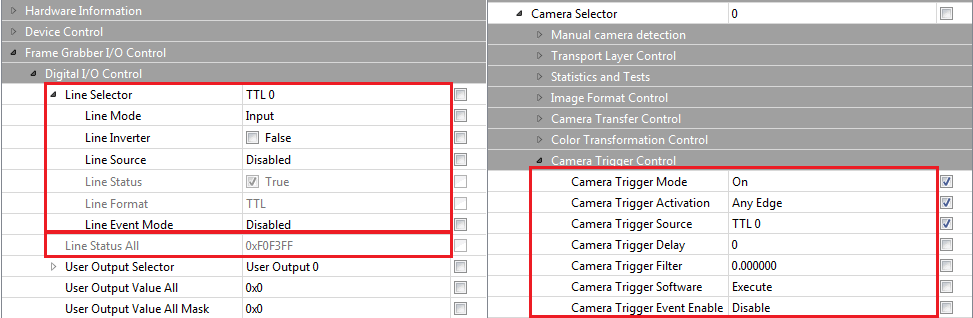
External trigger via GPIO
Steps to configure the camera to be triggered from external source of frame grabber GPIO:
- Connect trigger source to dedicated pins on the GPIO of the frame grabber, e.g. pin 18 [GND] and 19 [TTL0] for the Komodo II\III.
- In Digital I/O section of the grabber set "LineSelector" = "TTL0" and configure related parameters (if required).
- Check incoming trigger signals by refreshing status of parameter "LineStatusAll" (see image below). Changes in the trigger state can be seen by refreshing the "LineStatusAll" parameter value (if no changes are observed, it may be because the trigger is too fast. Reduce the trigger frequency to check the trigger changes, and return it to the desired state for regular operation).
- Configure trigger mode for the camera. Usually, this can be achieved by setting "TriggerMode" to "On", but this is a camera specific setting which may require additional configurations and have a different naming.
- Redirect the GPIO triggers through the frame grabber to the camera trigger by setting "CameraTriggerMode" to "On", "CameraTriggerActivation" to "AnyEdge" and "CameraTriggerSource" to the GPIO input (see image below).
Two frame grabbers triggering sync
Short description on how to enable syncronized triggering of two KAYA frame grabbers. This scenario requires GPIO pin-to-pin connection.
Connect two frame grabbers accroding to the instructions from "Frame Grabber and Simulator Hardware Reference & Installation Guide" section GPIO Connectors and section GPIO Pinout.
In case of Komodo II/III it will be pin 18 to pin 18 (GND) and pin 19 to pin 19 (TTL0).
- For all cameras on all grabbers
- Set "TriggerMode" on camera to "1"
- Set "TriggerSource" on camera to "LinkTrigger0"
- For the master grabber:
- Set "LineSelector" to "TTL0"
- Set "LineMode" to "Output"
- Set "LineSource" to "TimerActive0"
- Timer configuration
- Set "TimerSelector" to "Timer0"
- Configure FPS using formula = 1e+6/ExpectedFPS
- Set "TimerDelay" = Frametime/2
- Set "TimerDuration" = Frametime/2
- Set "TimerTriggerSource"
- Configure each connected camera
- Choose "CameraSelector"
- Set "CameraTriggerMode" to "1"
- Set "CameraTriggerActivation" to "AnyEdge"
- Set "CameraTriggerSource" to "TTL0"
- For the slave grabber
- Set "LineSelector" to "TTL0"
- Set "LineMode" to "Input"
- Set "LineSource" to "0"
- Configure each connected camera
- Choose "CameraSelector"
- Set "CameraTriggerMode" to "1"
- Set "CameraTriggerActivation" to "AnyEdge"
- Set "CameraTriggerSource" to "TTL0"
Frame rate trigger
The following example illustrates how to configure "Timer2" to define the frame rate of stream trigger for incoming data frames from the camera.
Step 1: Configure "Timer2" trigger source to be active in a continuous mode:
- Set "TimerSelector" to "Timer2"
- Set "TimerDelay" and "TimerDuration" to get the desired frequency.
- Set "TimerTriggerSource" to "KY_CONTINUOUS" mode
Step 2: Configure the frame grabber stream trigger control:
- Set "CameraSelector" to select the destination camera
- Set "TriggerActivation" to "AnyEdge"
- Set "TriggerSource" as "KY_TIMER_ACTIVE_2"
- Set "TriggerMode" to "On."
Step 3: Configure the camera trigger:
- Set "TriggerMode" in the Camera tab to "On".
- additional configurations might be needed to set up a trigger in the camera
Send N triggers
How to send N triggers from Frame Grabber to camera?
Example with trigger rate 200 (your camera need to support this rate) and 5000 triggers. The timer 0 will be activated by software trigger for debug purposes (later it can be changed to TTL source)
- First set a timer that will be high for the duration of the triggers generation (all 5000 triggers)
- Set "TimerSelector" = 0
- Set "TimerDelay" = 10
- Set "TimerDuration" = 25000000.0 // 25 seconds of operation, maximum 34 seconds
- Set "TimerActivation" = "RisingEdge"
- Set "TimerTriggerSource" = 43 // software trigger
- Set a second timer that will generate the triggers to the camera and select its source as a second timer. The trigger activation should be "Level High"
- Set "TimerSelector" = 1
- Set "TimerDelay" = 2500
- Set "TimerDuration" = 2500 // frame rate of 200 fps
- Set "TimerActivation" = "LevelHigh"
- Set "TimerTriggerSource" = 48 // timer 0 trigger
- Configure the camera trigger
- Set "CameraSelector" = 0 // camera index
- Set "CameraTriggerActivation" = "AnyEdge"
- Set "CameraTriggerSource" as "KY_TIMER_ACTIVE_1"
- Set "CameraTriggerMode" = "On"
- To activate 1 run (5000 triggers), use the Timer0 trigger software execute for debug. Then you can change the trigger source to TTL or any other IO.
- Execute "TimerTriggerSoftware"
- Make sure to check the "RXFrameCounter" to get the exact frames captured by the Frame Grabber and NOT the frame count in the bottom of the GUI picture window.
Triggers known issues
Lost frames at high FPS
When sending triggers it’s necessary to calculate the expected frame rate and set the delay accordingly.
- Trigger Interval: 12 ms
- Formula: 1 sec / 12 ms = 83.33 fps (approx.)
If the trigger rate is too fast, the last image may be lost.
Use our online FPS Calculator to ensure that your camera's frame rate and bandwidth settings are properly configured, also you can download Iron Excel Calc.
No frame at short triggers
It is a known issue that Iron cameras do not process triggers with durations shorter than 1.5 microseconds.